Turning an idea into a working prototype is one of the most empowering experiences in STEM learning. At The STEM Makers, learning goes far beyond theory. Students are encouraged to think like engineers — starting from real-world problems, designing solutions, validating ideas through simulation, and finally building working prototypes.
This project on a Smart Street Lighting System is a perfect example of that approach. This project began with a clear goal: design an energy-efficient street lighting system that operates automatically based on environmental conditions and real human activity. Using Arduino, sensors, simulation tools, and hands-on hardware implementation, the concept evolved into a functional smart street lighting demo that worked perfectly on the very first hardware trial. This Arduino-based Smart Street Lighting System is a powerful example of how thoughtful design, simulation, and hands-on implementation can come together.
💡 The STEM Makers Approach: Learn → Simulate → Build
Students followed a structured engineering workflow practiced at The STEM Makers:
- Understand the problem
- Translate requirements into system specifications
- Design the circuit
- Simulate before building
- Implement in hardware
- Test and refine
This method ensures both conceptual clarity and practical confidence
🌍Step 1: The Problem: Energy Waste in Conventional Street Lighting
Traditional street lights typically remain ON throughout the night, regardless of traffic or pedestrian activity. This leads to:
- Unnecessary power consumption
- Increased operational costs
- Reduced sustainability
- Avoidable light pollution
💡 Step 2: The Solution: Demand-Based Smart Lighting
The project focuses on an intelligent street lighting system that responds to both environmental light conditions and human presence, providing lighting only when required, without compromising safety:
✔ Lights should remain OFF during daytime
✔ Lights should turn ON only at night
✔ Lights should activate when motion is detected
✔ Lights should turn OFF automatically when no activity is present
✔ System should conserve energy efficiently
The student insisted on using a LDR and a PIR Sensor and programming them for solving the problem.
🔬 Step 3: Circuit Functionality from Specifications
Based on the project requirements, the logic was structured as follows:
Daytime:
Ambient light is high → System keeps lights OFF
Nighttime:
Ambient light is low → System becomes active
Motion Detected at Night:
Lights turn ON automatically
No Motion for a Set Duration at Night:
Lights turn OFF to conserve energy
This demand-based operation ensures energy is used only when necessary.
🧠 Core Components Used
Based on these requirements, the system was designed using three key components:
- Arduino Microcontroller — The brain of the system
- LDR (Light Dependent Resistor) — Detects ambient light to determine day or night
- PIR Sensor — Detects motion from pedestrians or vehicles
- LED — Represents street lights
🖥️ Step 4: Simulation Using Tinkercad Circuits
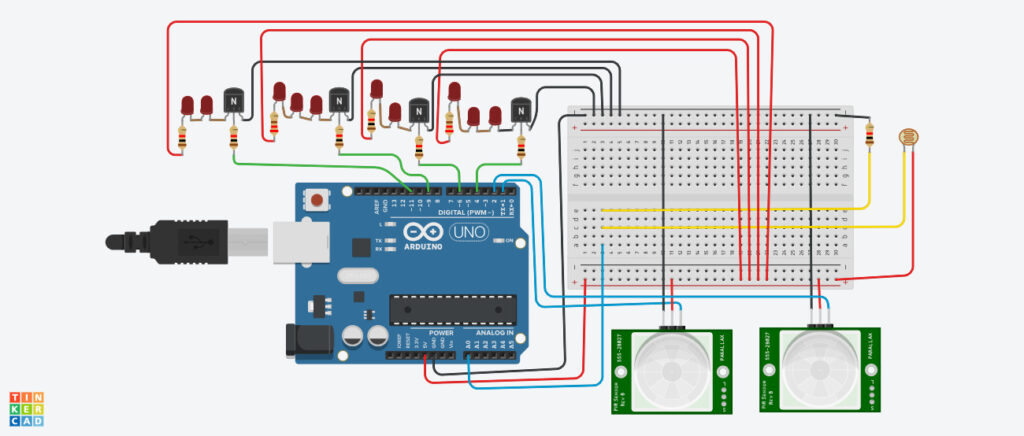
A lot of projects online had LDR module for street light control and PIR for controlling lighting in closed spaces, but none for controlling lighting in open environments using both. We set to work designing the circuit for our application in house.
Before building the physical circuit, the design was tested virtually using Tinkercad Circuits. Simulation plays a crucial role in modern engineering permitting designers safe experimentation and validation by enabling:
- Testing of circuit connections
- Verification of sensor behavior
- Testing of Program logic
- Debugging of Arduino code
- Adjustment of thresholds for darkness and motion
- Prevention of hardware damage
By simulating real-world scenarios — such as night conditions and movement — the design was refined until it behaved exactly as intended.
💡 1st Simulation
We first simulated the LDR as a variable resistor in a voltage divider circuit to determine in which configuration voltage rises or falls with light. We wanted the LDR to disable the whole circuit when it is day time i.e. where the voltage rises with light. The simulation that helped select the correct LDR configuration is in this video.
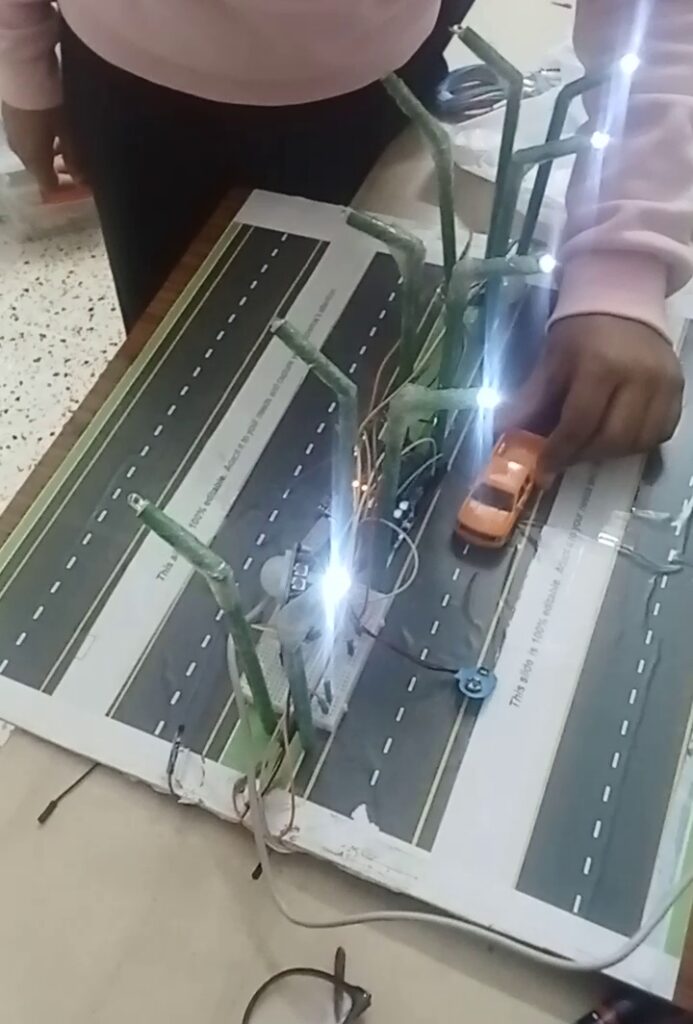
💡 2nd Simulation
We simulated a circuit by connecting one LED, one LDR, one PIR sensor to the Arduino board to test the logic that was discussed above as in the video below.
Arduino controlling LED based on LDR , PIR inputs
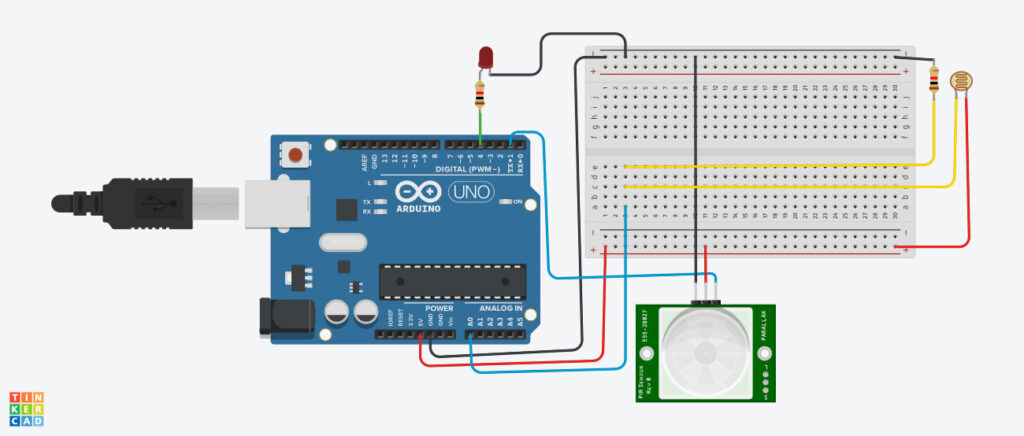
💡 3rd Simulation
Then we simulated the full circuit with LDR, 2 PIR sensors, one for forward traffic and one for reverse traffic, each controlling 5 lights. During simulation, sensor inputs were adjusted to mimic real-world conditions such as darkness and motion. The Arduino code was refined until the system behaved exactly as intended. The first version of the simulation, which used one arduino pin for each street light control, is in this video.
Arduino Project Simulation – How to Build Smart Street Lighting

🔧 Step 5: Hardware Implementation
Once the simulation results were validated, the circuit was assembled using real hardware components.
Hardware Setup Included
- LDR configured as a voltage divider
- PIR sensor connected to a digital input pin
- LEDs representing street lights
- Arduino programmed with validated code
The most exciting moment came when the system was powered up
✨ The system worked perfectly on the very first attempt.
The lights responded instantly to darkness and motion exactly as predicted in simulation. No rewiring. No debugging. Just immediate success — highlighting the effectiveness of simulation-driven design and careful planning — a key emphasis at The STEM Makers.
But our joy was short-lived.
The physical implementation presented us with other challenges in the design, one which we suspected during the simulation phase, another which we have not anticipated.
- The quantum of wiring used just for controlling 10 street lights
- Limitation on the number of lights that can be controlled automatically with each light connecting to one corresponding Arduino port.
🔁 Step 6: Iteration on Circuit Simulation with lessons from hardware implementation
💡 4th Simulation
We learnt that the transistor can be used as a switch to turn ON/ OFF loads connected to Arduino. To test the transistor as a switch for our application, we went back to the basics, simulated a circuit with LDR connected to the base of the transistor, in series with a resistance, LED connected to the collector in both light active and dark active configurations as in the simulation in this video.
Basic LDR controlling LED with Transistor as a switch

💡 5th Simulation
Once we were confident of how the LED can be controlled through the transistor based on LED input, we added Arduino to the circuit, programmed it to switch on an LED through the Transistor, where transistor switch function is dependent on Arduino output which in turn is dependent on the output from PIR sensor and LDR as in this simulation video. .
Arduino controlling LED, through Transistor as a switch based on LDR , PIR inputs
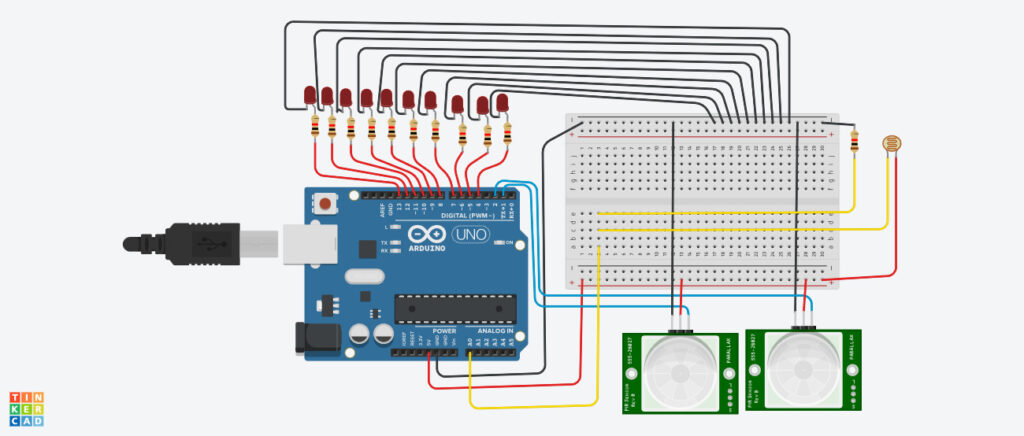

💡 6th Simulation
We incorporated the transistor as a switch into our first iteration of Smart Street Lighting System, replacing the earlier connections and saw the quantum of wires reduced significantly. Also we used only 4 Arduino ports compared to 10 earlier, leaving 6 ports available for future use. A simulation of the same is in this video.
Arduino Project Simulation – How to Build Smart Street Lighting

⚙️ How the Smart System Operates
☀️ During Daytime
The LDR senses high ambient light.
➡️ Arduino keeps the lights OFF regardless of motion.
🌙 At Night
Low light intensity activates the system.
🚶 When Motion is Detected
The PIR sensor signals the Arduino.
➡️ Lights turn ON automatically.
⏳ When No Motion is Present
After a preset delay:
➡️ Lights switch OFF automatically, conserving energy even during nighttime.

🎯 Key Learning Outcomes for Students
This project provided valuable hands-on experience in:
- Problem-solving and systems thinking
- Translating real-world problems into engineering solutions
- Electronic circuit design from functional requirements
- Sensor integration and calibration
- Embedded programming with Arduino
- Importance of simulation in engineering workflows before hardware implementation
- Translating virtual designs into real hardware
- Confidence gained from successful real-world implementation
- The iterative design process that made them experience improvement is a process, not an event.
- Building resilience and a growth mindset by identifying challenges and improving the design.
Most importantly, they experienced how engineering can directly address sustainability challenges.
🌱 Real-World Applications
Smart street lighting systems like this can significantly reduce electricity consumption and deployed in:
- Smart cities and urban infrastructure
- Residential colonies and gated communities
- School and college campuses
- Industrial premises
- Rural and low-traffic roads
- Parking areas and walkways
Such systems significantly reduce electricity consumption while maintaining safety and visibility. Beyond energy savings, such systems also contribute to sustainability and smarter urban infrastructure.
🚀 Conclusion
This project demonstrates how thoughtful design, simulation, and systematic implementation can transform a simple idea into a practical solution. This project demonstrates how accessible tools, structured thinking, and hands-on learning can produce impactful technological solutions. By combining environmental sensing with motion detection, the system delivers intelligent lighting that is safe, sustainable and energy-efficient — a small step toward smarter, greener communities.
From virtual simulation to real hardware success in the very first attempt, this journey highlights the true spirit of STEM — learn, design, test, build, and innovate.
🚀 Innovation Through Hands-On STEM Learning
At The STEM Makers, projects like these help students move from passive learning to active creation. By working on meaningful real-world challenges, they gain the skills, mindset, and confidence needed for future careers in technology and engineering.
Want your child to build real engineering projects like this?
Explore programs at The STEM Makers and discover how hands-on STEM education can unlock creativity, problem-solving, and innovation. Structured STEM programs can empower students to transform ideas into real-world solutions.